Swedish Princess Cake for a Second Birthday

IMG_7279

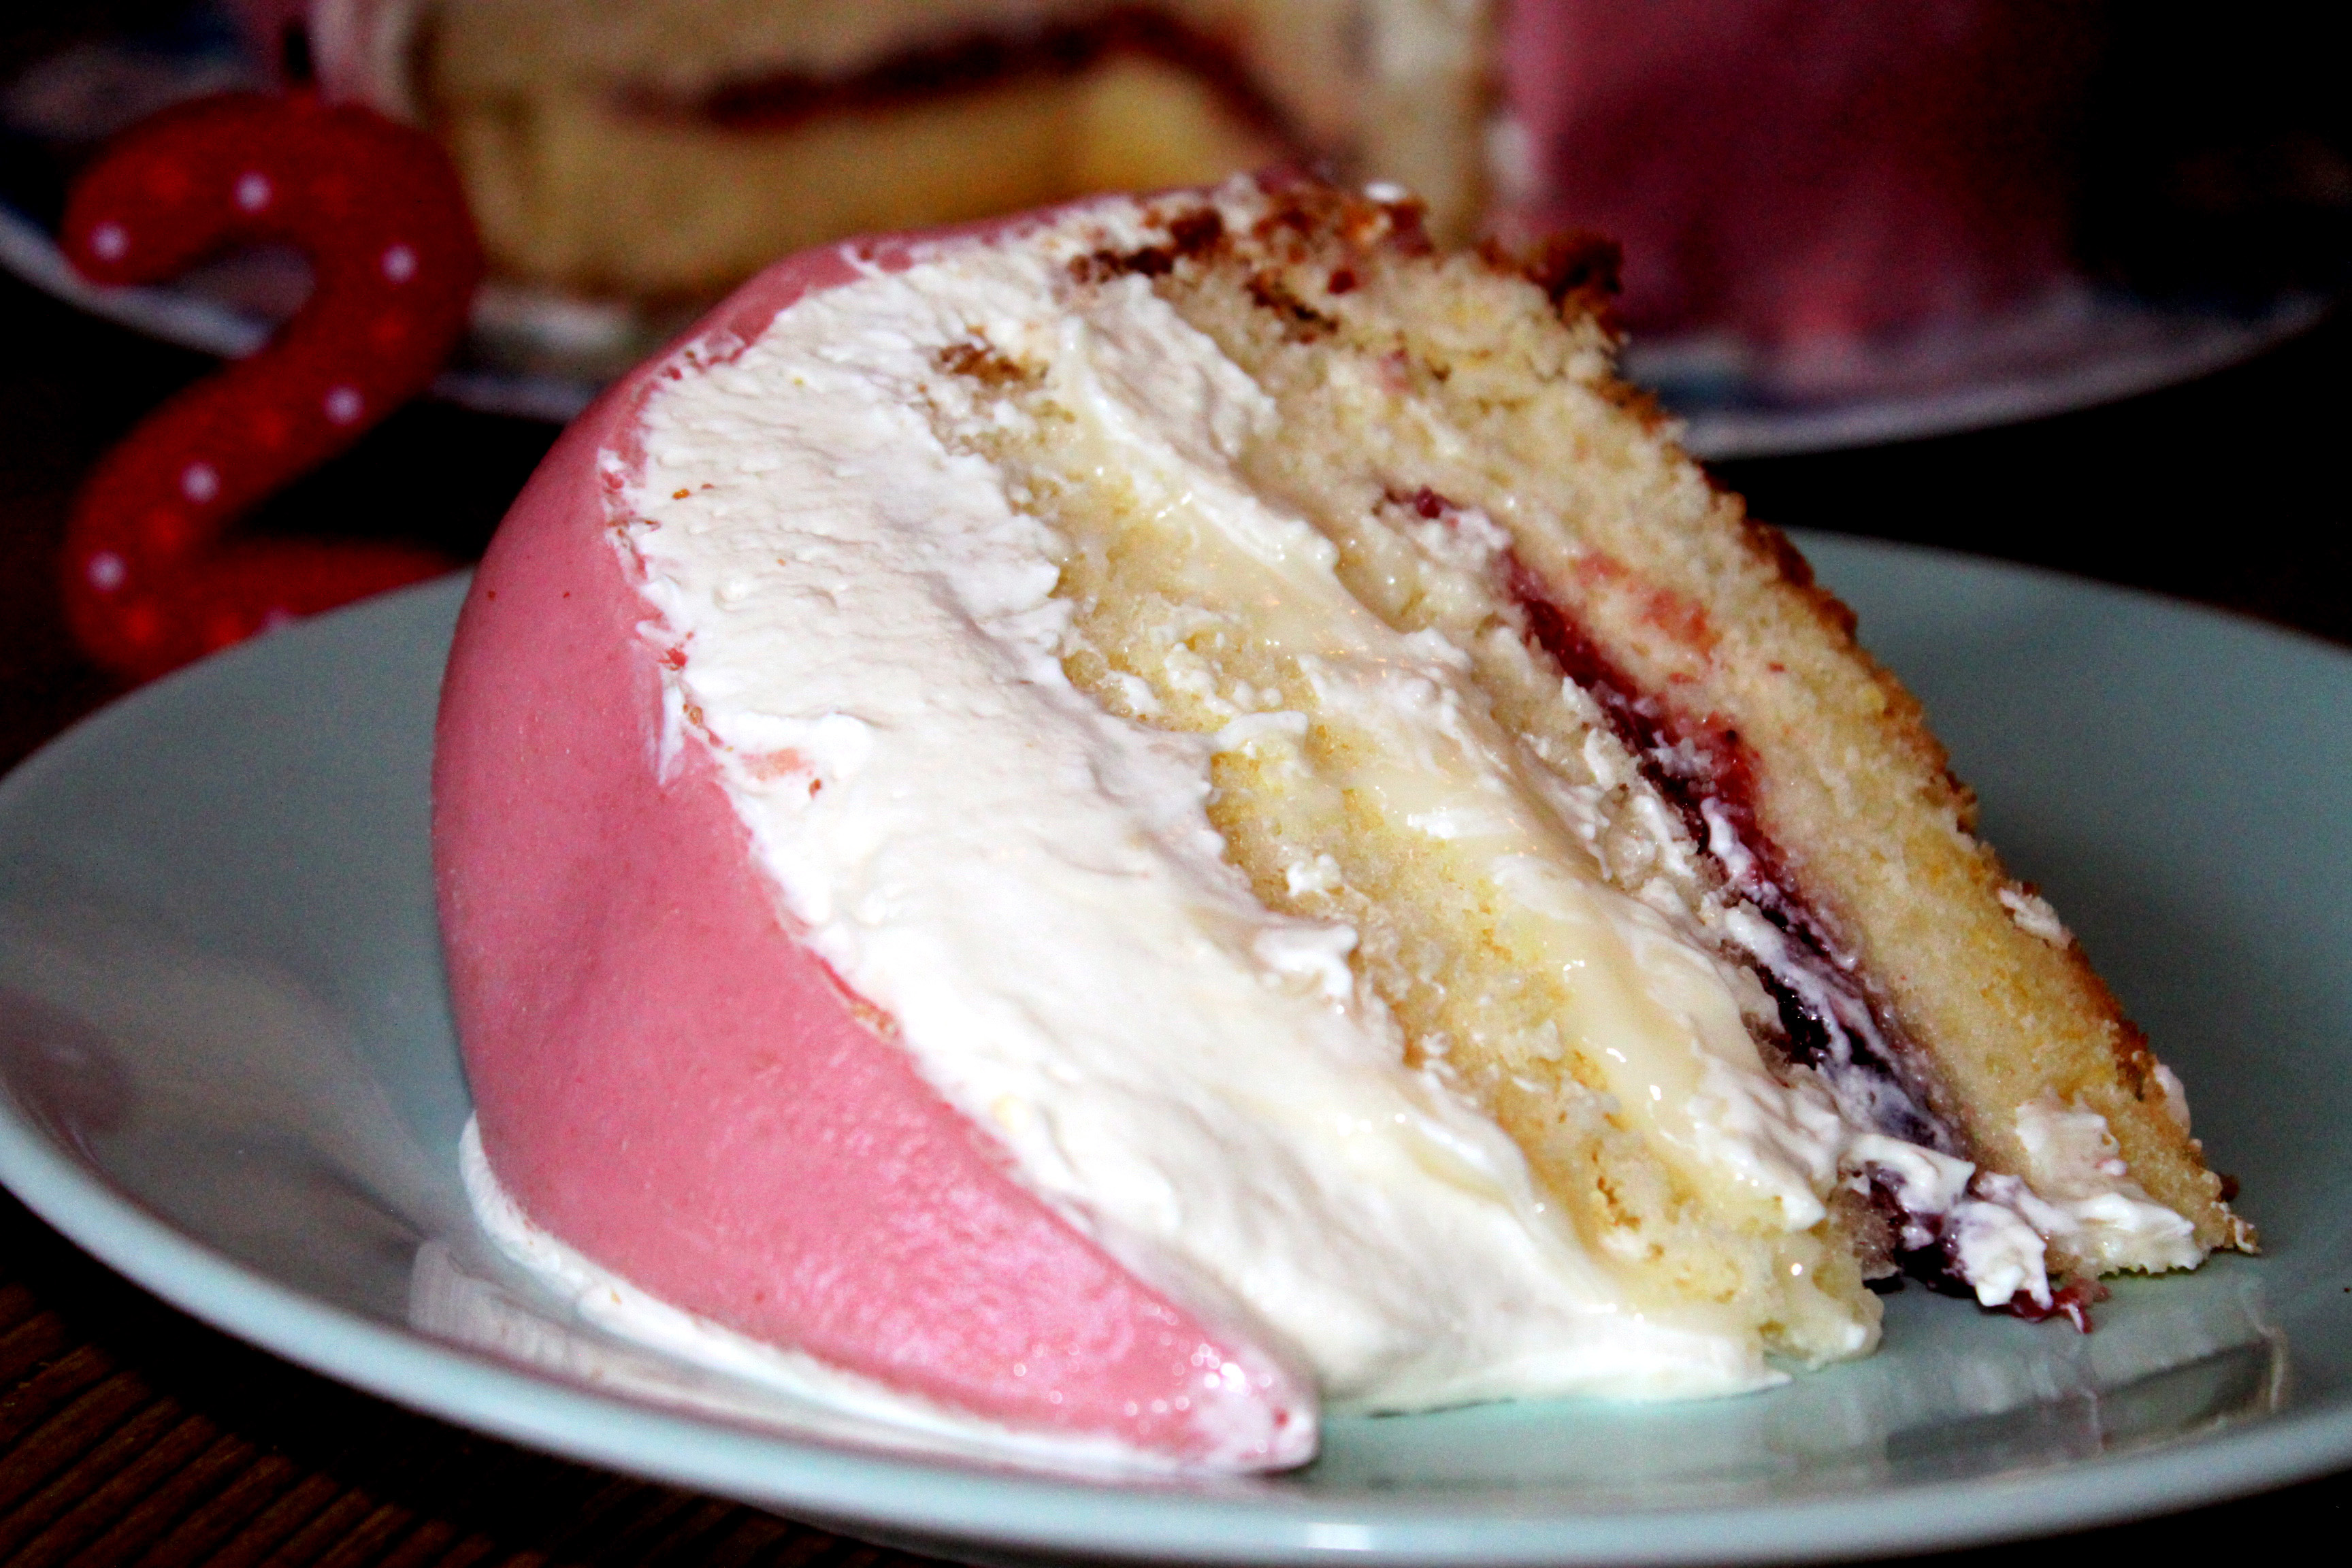
Although I find the current trend for referring to little girls as princesses somewhat depressing – as if that is the ultimate aspiration – I opted to bake The Little Hen a prinsesstårta for her second birthday. This sumptuous Swedish confection is so named because the princesses Margaretha, Märtha and Astrid were said to be smitten with the cake baked by Jenny Åkerström during the 1930s. An impressively precarious dome composed of light sponge, jam, crème patisserie and whipped cream layers – capped with a marzipan mantle – it isn’t hard to understand the enduring popularity of this concoction. So popular is it, that in Sweden, the 3rd week of September is officially prinsesstårta week and 50,000 of the cakes are sold annually!

Princess cakes are traditionally a delicate pistachio green and look exceedingly pretty when adorned with a pink rose, often fashioned from marzipan. However, for The Little Hen’s birthday, I coloured the marzipan palest pink and popped a number candle on the top. I’ll be honest, this is a fairly daunting cake and seems to have the potential for disaster at various stages (in reality, it wasn’t nearly as fiddly as I’d envisaged). Fortunately, it’s not too dissimilar to a bombe-like, three dimensional English trifle, so fear not – if it collapses it will still taste delicious (and you can airily claim that it was intended to be a Scandinavian riff on a trifle all along).

Top Tips:

My sponge had a sugary, crackly top after baking (like a trifle sponge). I removed these shards for easier slicing.

When waiting for the crème patisserie to thicken, switch back to a whisk if it begins to look lumpy.

If the crème patisserie does happen to remain lumpy, give it a quick sieve and it should be lump-free once more.

Rolling the marzipan out on a Teflon or pastry sheet makes things much easier.

White marzipan is far easier to colour than golden.

You can make the sponge cake and crème patisserie the day before.

If you really, really loathe marzipan then you can use fondant icing instead (sssh, I won’t tell…)

Recipe 

Cake

4 eggs

200g sugar

80g cornflour

60g plain flour

1 teaspoon baking powder

Crème Patisserie

4 egg yolks

100g sugar

25g Cornflour

350ml milk

1 teaspoon vanilla extract

Additional Ingredients

568-600ml whipping or double cream

1 tablespoon sugar

Strawberry or raspberry jam

500g marzipan

Food colouring

Icing sugar for rolling out

Semolina or breadcrumbs for the tin

Method

Cake

Preheat the oven to 170C/325F/Gas Mark 3

Butter a fairly deep 20cm tin and dust with semolina or breadcrumbs.

Whisk together the eggs and sugar until pale, thick and creamy. Combine the flours and baking powder and deftly fold into the eggs. Take care not to knock the air out or your cake will not rise properly. Bake for 35-40 minutes. Turn out and cool on a wire rack.

Crème Patisserie

Whisk together the eggs and sugar. Add the cornflour and whisk again so there are no lumps. Heat the milk and vanilla almost to boiling point. Pour over the egg mixture, whisking vigorously. Pour back into the pan and cook over a medium-low heat whilst stirring continuously. Once thickened, put the crème patisserie into a bowl and cover immediately to prevent a skin forming.

Assembly

Slice your cake into three layers. Spread a thin layer of jam over the base, leaving a border so the filling doesn’t ooze out the sides.

Place the next layer on top and spread over ¾ of the crème patisserie – again leaving a small border.

Whip the cream with the sugar and 1 teaspoon of vanilla extract until you have firm peaks.

Place the final layer of cake on top and cover with whipped cream. Smooth the cream around the edges of the cake and create a mounded dome on top. Chill for 2-4 hours to allow the cream to firm up enough to support the marzipan.

Colour the marzipan as you wish and roll out so that it is large enough to cover the entire cake. Roll the marzipan around the rolling pin and place it behind the cake. Roll it across and over towards yourself so the cake is covered. Smooth out any wrinkles and trim the excess. Decorate with a rose or candle. You can hide any imperfections with a flurry of icing sugar or some decoratively piped icing or chocolate.

Serve as soon as you are able, to rapturous admiration (store any leftovers the fridge). Being all birthday-ed out, The Little Hen was overtired and in an utterly foul mood so didn’t appreciate all my hard work. Fortunately, everyone else thoroughly enjoyed the cake and I think it may become a birthday tradition from now on.


image

The Rye

Seinfeld - The Rye

When our youngest was a newborn, I spent many hours cradling her refluxy little form and half-watching Seinfeld DVD boxsets. I’m positive that many new parents can relate to the lost hours slumped in front of the TV during those first few shattering, exhaustion addled weeks – comforting, undemanding and, crucially, familiar programmes have become fondly entwined with the memories of each of our children during this stage. For us, Seinfeld fitted the bill perfectly and the frequent food references served as reminders to feed ourselves as well as our tiny new creation: the big salad, thirst-inducing pretzels, chocolate babka and, of course, the infamous rye loaf that almost pushed a desperate George Costanza over the edge, nudged us blearily towards the kitchen in search of sustenance.

Okay this isn’t a marble rye, the bread so beloved by the Costanza family, but it is pretty delicious all the same. Chewy, robust and filling – this is one versatile loaf. My recipe mixes rye, spelt and a touch of white flour to produce an open textured crumb that’s very different to the dark, dense, albeit delicious, ‘corky’ breads you may be accustomed to.

The flavours in this particular loaf – fennel and black treacle – marry beautifully with a summery slather of cool, creamy cheese, a crisp apple and maybe a little smoked ham, but also perfectly partner a hearty bowl of soup during chilly weather. Alternatively, how about some sharp, crystalline cheddar with a spoonful of tamarind chutney? Or – as part of a smörgåsbord – thinly sliced alongside boiled eggs, pickled beetroot and dill-infused gravlax? You can also ring the changes and add caraway seeds, orange zest – or herbs if you’re wandering down a savoury path. However, this makes incredible buttered toast and is phenomenal with a tart jam for breakfast, in which case omit the herbs for a more neutral taste.

As well as lending a distinct flavour, the syrupy, burnt toffee scent of the treacle pervades the entire house as this bakes: imagine the IMG_7078heavenly aroma of freshly baked bread enhanced by a deeply intense caramel note. Truly one of the great pleasures of baking. This amenable dough can be popped into a loaf tin, but I prefer a more freeform approach – this produces a pretty artisanal oval from which you can cut long, elegant slices. On the other hand, you could make excellent rolls; very good for picnics – sufficiently robust to withstand travel, yet light enough to leave ample stomach space for further alfresco fare.

I may balk at mugging little old ladies à la Jerry Seinfeld, but, in the words of the inimitable Estelle Costanza, I would certainly takes buses to get that rye…

Ingredients

200g rye flour

200g spelt flour

100g strong white (bread) flour

1 sachet fast acting dried yeast

1 tablespoon black treacle

1 teaspoon salt

390ml warm water

Method

Combine the flours, salt and yeast. Add the treacle and gradually pour in the warm water as you may not need all of it. Knead for 5-10 minutes – or use a freestanding mixer and a dough hook. This will be rough and shaggy, rather than the smoothly elastic doughs you may be more accustomed to. Cover with a clean tea towel and leave in a warm spot, such as an airing cupboard of sunny windowsill, for around an hour or until doubled in size.

Knock back (punch the centre of the dough – it will collapse), knead briefly and shape. Leave to prove for a second time for approximately 30-40 minutes.

Preheat the oven to 220C/425F/Gas Mark 7

Bake the loaf for 10 minutes and then reduce the oven temperature to 190C/375/Gas Mark 5. Bake for a further 30 minutes or until it sounds hollow when you tap the underside.

Remove from oven and leave to cool. As with all breads, if you try and slice the loaf whilst it is still hot, the crumb will compact and the texture will be doughy.

IMG_7089

As you like it…Okonomiyaki

Image

So… we almost moved to Tokyo. Startling news, right? Actually we still could go, and someday we may, but for now it’s tricky – even though it would be a remarkable experience. Why ever have we passed up such an extraordinary opportunity, you ask? Are we crazy? Well, quite possibly, but although it would have been a wonderful adventure, there are some significant practical hurdles to consider.

One major issue is The Hatchlings’ education; many expats are employed in the financial sector and relocate on absolutely phenomenal packages – often including housing, but most certainly the eye-watering cost of International school fees. With Mr Jolly Good Egg being an arty, media type we’d have to manage without such perks and live a more local lifestyle. Great, the authentic Japanese experience? Well, yes, immersing ourselves in the culture would be fantastic and a brilliant learning opportunity for all of us. However, we’ve been advised of the impossibility of sending non-Japanese speaking children to exclusively Japanese speaking schools. Understandably, with most expat kids being educated privately, the state schools just aren’t geared up to accommodate foreign pupils. Moreover, Japanese living costs are sky high (did I mention that Tokyo is the most expensive expat city in the world?), so finding the extra yen for multiple tuition fees would – even though the company is lovely and generous – be a real stretch. A frustrating situation for all concerned.

Anyway, enough waffle; let’s get back to the food. Swept up in an impulsive whirlwind of fervour, we, culinary speaking, began a whistle-stop tour of Japan. Replicating some mouth-watering recipes to accompany our zealous viewing of Studio Ghibli and other, more obscure, Japanese movies, a firm family favourite was okonomiyaki  (‘whatever you like – grilled’): a super tasty omelette/ pancake/pizza hybrid, incorporating veggies, meat, sometimes noodles, and, curiously, a ‘flavour grid’ of a Worcester-alike sauce – plus mayonnaise. Healthy Japanese junk food, what’s not to like?

It transpires that there are two main versions: Osaka or Hiroshima style. The Hiroshima variation is layered: a pancakey disc topped with  shredded cabbage, bacon and noodle layers is then adorned with a fried egg – delicious. Osaka cooks take a simpler, no-nonsense approach and mix the additional ingredients directly into the batter and omit the noodles – so it’s lighter too. Being equally tasty, but less fiddly, I favour the latter type. Both kinds of okonomiyaki are smothered with the aforementioned flavourful sauce, decorated with a lattice of Japanese ‘Kewpie’ mayo and strewn with spring onion confetti for a fresh, allium bite.

I must confess, I made an anglicised version; somewhat unsurprisingly, I had no dashi to hand, nor any katsuobushi (bonito flakes), aonori (dried green seaweed flakes) or nagaimo root. Hmmm, you may be wondering how on earth, having omitted several seemingly key ingredients, can this still be okonomiyaki? Yet, as there are countless variations and the dish isn’t at all similar to any other concoction I have ever made, I feel quite at ease calling it okonomiyaki. After all, the very name means ‘as you like it’, so there must be some margin for experimentation…

Ingredients

250g (2 cups) plain/all-purpose flour

270ml (2 cups) water (with dashi if you have some)

4 eggs

Pinch of salt

Pinch of sugar

½ a cabbage very finely shredded – a food processor or mandoline is invaluable here

6 -8 slices of bacon/thinly sliced pork

Oil

As there isn’t a definitive recipe, there’s a lot of leeway in terms of the vegetable and meat add-ins, so feel free to include whatever you fancy. It’s a great recipe for using up leftovers lurking at the back of the fridge. A slightly bendy carrot? Terrific. A few lonely shrimp? Bung them in! A forlorn and unloved chicken leg? Yep, you’ve got the makings of the kashimin-yaki variant. Half a bowl of Coco-Pops? Okay, maybe not, but you get the picture – quick, frugal and reduces wasted food.

Spring onions for garnish

Okonomiyaki sauce (or make an ersatz version from 4 tablespoons tomato ketchup, 1-2 tablespoons Worcester sauce, 3 teaspoons honey, 1 teaspoon rice vinegar and ½ teaspoon soy sauce – heated until bubbling). A honey BBQ sauce can be used in a pinch.

Mayonnaise.

Method

Whisk together the flour, water, eggs and seasonings. Stir in cabbage and optional vegetable, meat or seafood add-ins. Heat oil in a frying pan and ladle in spoonfuls of batter. Traditionally, okonomiyaki are around 20cm in diameter, however, I quite like to make mini (think American or Scotch pancake size) ones – around 3 per person. Once the underside is cooked, lay strips of bacon on top of each pancake and flip. Allow the bacon to cook through thoroughly. You could add a fried egg if you wish.

Slide on to a plate, bacon side up, and daub liberally with the okonomiyaki sauce. Add a mayonnaise lattice (a squirty bottle is handy) and sliced spring onions. Serve immediately.

Image

Olive Oil Yoghurt Cake

Image

Gâteau au yaourt, or rather more prosaically, yoghurt cake, is a beloved French classic and it’s not hard to see why. With its pillowy softness and barely-there sweetness, it makes the perfect goûter – after school snack – and provides the ideal foil for all manner of glazes, compotes or sauces should your fancy be tickled by such embellishments. Indeed, the recipe is so effortless that it’s apparently the first cake that les enfants Français learn to bake – under the watchful eye of a benevolent grandmother, of course – no wonder that it is affectionately termed le gâteau de mamie.

On Sunday, we were running late so plans to visit the seaside were shelved (we live a long, long way from the beach) and, instead, we plumped for an afternoon spent walking with our two dogs. Following several hours of tramping through mossy woods and haring around the labyrinth (an eerie little warren of twisted bowers, thickly carpeted with violet blooms and withered leaves – an unanticipated delight), we returned home tired and hungry. Providentially, I had half a (large) pot of yoghurt leftover from the previous evening’s marinade so put it to good use here. I don’t know if you’ve ever tasted a Japanese Cotton Soft Cheesecake, but the level of sweetness is not dissimilar – although this yoghurt cake has a much drier, firmer crumb and a definite crust. Labouring under the notion that I’d baked a homemade equivalent of a pre-packaged British angel cake, the Biggest Boy queried the absence of pink, yellow and white layers. I can see why he wondered; the flavour is somewhat comparable, although it is less sugary and doesn’t include that cloying, synthetic buttercream that the striped slabs of shop bought angel cake always seem to have.

Not being French and, as such, sadly lacking a Grand-Mère, I’ve cobbled together a nice, albeit inauthentic, version of this charming cake. If any of my French readers would like to share their own (recipe – not grandmother!), I would certainly like to try it. Not being terribly fond of vegetable oil, I opted for olive, though you could use either. I’ve also stumbled across a recipe that utilises melted butter, so there’s another option. However, from what I can gather, butter is not traditional at all and would alter the cake’s pale interior as well as the taste, I imagine. You can play around with the flavours: chocolate, lemon or orange would all work beautifully. Nevertheless, there’s something especially lovely about the snowy-white purity of the plain version.

Ingredients

230g caster sugar

2 eggs

125ml olive oil

125ml natural yoghurt

300g self-raising flour

1 teaspoon vanilla extract

Splash of milk

Method

Preheat the oven to 180C/350F/Gas Mark 4

Oil a 20cm cake tin (I use a silicon mould for easy removal) and very lightly dust with flour.

Whist together the sugar and eggs until thick and creamy. Still whisking, carefully add the olive oil. Add the yoghurt and vanilla and stir the flour in gently. If the mixture looks a little thick you can add a drop of milk to thin slightly.

Pour the batter into the prepared tin and bake for around 50 minutes. It tends to brown quite quickly so you may need to cover with foil part way through the cooking time. This cake is deceptive and will probably appear cooked long before the centre is no longer liquid. To test, poke a skewer into the middle – if it hisses and comes out wet, pop the cake back into the oven for another 10-15 minutes at least.

Once baked, cool for 5-10 minutes in the tin before unmoulding.

Perfect with a cold glass of milk for the children and a pot of jasmine tea for grownups.

Image

Shakespeare’s Pudding – or Rosemary Apricot Cobbler

image

Apricots are fuzzy-skinned fraudsters; time and again I buy them only to be disappointed once they reveal themselves to be woolly and tasteless – despite their plump and inviting appearance. Worse still, are those that are, on closer inspection, pale and tinged with green; these stubbornly refuse to ripen, lingering reproachfully in the fruit bowl where they eventually wither and shrivel without ever passing through the stage of palatability.

Bathed in sunshine, fresh from the tree, Greek apricots are delightful – and as honeyed and succulent as ever you could wish. Sadly, this isn’t an experience often replicated in Britain and so we must make do with those little punnets of watery-fleshed bullets on sale in supermarkets around the country. Fortunately, poaching has the almost magical ability to transform even the meanest and most unyielding of fruits into glowing, golden orbs worthy of the pudding plate.

Akin to a Proustian madeleine, bottled apricots involuntarily evoke memories of summer’s past – of languorous bumblebees and velvety, heavily perfumed roses. Served atop ice cream or beneath billowing waves of brandied syllabub, these preserved fruits make an uncomplicated, yet luxurious, finish to any meal. No doubt it’s already occurred to you, but may I suggest some langues du chat or other thin, snap-able, biscuits – bought or homemade – to add a crispy contrast?

A refreshing apricot fool is always most welcome, as is, during colder months, a classic crumble or buttery buckle – with a jug of vanilla-flecked custard or generous dollops of clotted cream alongside. Today, however, we ate our apricots in cobbler form – very popular and there was even enough for second helpings.

Recipe adapted from Jamie’s America– Jamie Oliver (available here).

Ingredients

500g apricots

50g soft brown sugar

100ml white wine or water

Sprig of rosemary

Butter to dot

Topping

100g butter

100g self-raising flour

50g ground almonds

50g soft brown sugar

Few drops of almond extract

Method

Preheat oven to 220C/425F/Gas Mark 7

Butter a medium sized baking dish (I use an old Pyrex oval).
Halve apricots and remove stones. Place, cut side uppermost, in the dish and sprinkle over the sugar, add the liquid and dot with butter. Tuck the rosemary amongst the fruit so that it is covered, as much as possible, by the wine/water. Roast for 5 minutes then reduce the oven temperature to 190C/375F/Gas Mark 5 and cook for a further 10 minutes.

Meanwhile, prepare the cobbles. Whizz the butter, sugar, almonds, almond extract and flour in a food processor. Add 1-2 tablespoons of cold water to form a soft dough.

Remove the peaches from the oven and discard the rosemary. Place large spoonfuls of dough on top of the fruit. Bake for 20 minutes or until the cobbles are golden and cooked through.

Serve with cream, custard or ice cream – just be aware that the fruit filling gets extremely hot, and remains volcanic for an especially long time, so it’s advisable to let this cool a while if little people are going to be having any.

image

Let them eat cake…

image

A traditional Victoria sponge, what could be nicer? Well, this weekend I made the mistake of tinkering with my tried and true recipe and used the brilliant Dan Lepard’s suggestion of incorporating 1/3 of the flour into the creamed butter mix. Maybe I should just have gone with the Guardian’s recipe here in its entirety  as I found the resulting cake to have a denser, drier crumb than usual (though in the interest of fairness, the recent adjustments to my KitchenAid may also have played a role).

There’s something pleasingly wholesome about a fairly plain, old-fashioned cake – although good butter and eggs really are essential when there’s no distracting glitz and glamour. Of course, you can gussy up the basic recipe and really go to town with the fillings and frostings or add essences and extracts to the batter, it’s entirely up to you. Personally, I love the simplicity of this cake as a counterpoint to all the triple Oreo, peanut butter, chocolatey, cookie dough stuffed confections that are so wildly popular at the moment (although those are terrific too!)

Anyway, made with the following method, this is a charming, buttery, jammy delight; an absolute classic and perfect with a pot of tea.

Ingredients

225g softened butter

225g caster sugar

4 eggs

250g self-raising flour

1 teaspoon vanilla extract

Jam to fill

Method

Preheat the oven to 180C/350F/Gas Mark 5
Grease a couple of 20cm sandwich tins, dust lightly with flour.
Cream butter and sugar until light and very fluffy. Add the eggs followed by the flour and vanilla. Mix lightly so as not to toughen the mixture. Alternatively, you could just bung it all in the food processor; in which case, add a teaspoon of baking powder. Spoon into tins and bake for around 20 minutes. You’ll know when they’re done as the cakes will shrink from the sides of the tins, they will feel springy to the touch and a toothpick will come out clean.
Allow to cool for a few minutes before turning out.
Fill with jam and dust with icing – or caster – sugar.

In the beginning…there were brownies

image

Hellooo…writing this feels somewhat akin to shouting into the ether – only to hear my own, mocking echo reverberating around my ears. Notwithstanding factors such as having a miniscule readership and being about half a decade too late, I have, after years, many years, of saying I’m going to start a blog finally taken the plunge.

Feeling slightly daunted, I will mainly be writing about the food I prepare for Mr Jolly Good Egg and the Hatchlings. I’ll be including both the successes and the failures and highlighting suspected reasons for the particularly outstanding flops (i.e. my own folly – or an inherent flaw in the recipe), plus suggestions for improvements and tweaks.

And now for the brownies, because they’re always welcome, right?

This is my go-to brownie recipe; undemanding and handy for when you only have a few basic ingredients in the cupboard, but still fancy something warm and chocolately in a hurry. It’s also effortlessly adaptable – you can, and I frequently do, add chopped walnuts, mini marshmallows, swirl peanut butter into the mix – the list goes on. You can also omit the coffee, but I rather love the smoky depth it lends to what is, essentially, an uber simple, basic brownie batter.

Ingredients

150g butter

250g caster sugar

150g brown sugar (dark or light depending on preference – or what you happen to have)

2 eggs

50g cocoa powder

250g plain flour

2 scant teaspoons baking powder

1 heaped teaspoon instant coffee dissolved in a splash of hot water (or, even better, the equivalent of freshly brewed coffee)

150-200g chopped chocolate

Method

Preheat the oven to 180c/gas mark 4/350F

Grease and line the tin with baking parchment – or use one of those teflon sheets. Don’t omit this step or your brownies will, frustratingly, be stuck in the pan.

In a saucepan, gradually heat the butter and the sugars until dissolved – add the coffee. Remove from the heat and allow to cool slightly. Add the eggs and mix in the flour, baking powder and cocoa. Add the chopped chocolate; stir briskly and pour batter into the awaiting tin. Bake for around 40 minutes (I say around 40 mins because it’ll vary quite a bit depending upon your own oven’s idiosyncrasies, etc. What you’re looking for is a crispy, crackly top that’s moist and fudgy beneath. Test by inserting a cocktail stick, skewer, etc into the brownie – you want to see slightly damp batter clinging to your implement of choice. Don’t take it out of the oven whilst it’s still a chocolate puddle, but do bear in mind that it will continue to cook as it cools).

Particularly nice eaten whilst it still has the lingering memory of the oven’s warmth, but they’re still lovely when cool.

This recipe also halves perfectly if your family is less gannet-like than mine.